Showing posts with label Pattern. Show all posts

Monday, September 9, 2013

Butterfly Block with Tutorial

Hello everyone! I hope you're all doing well. I wanted to share this butterfly block that I came up with last night. I thought it was pretty cute, so I made one, then two, and then decided to finally take pictures and do a tutorial with the third one. :) I hope you enjoy this block, and if you make one I'd love to see the finished product!

So, here are the directions and what you'll need to make your very own butterfly:


You'll need 4 different shades of fabric:

Background fabric
Body fabric
Top wing fabric
Bottom wing fabric

From the background fabric cut:
(1) 10.5" x 2.5" rectangle
(10) 1.25" squares
(6) 2.5" squares


From the body fabric cut (1) 10.5" x 2.5" rectangle


From the top wing fabric cut (2) 6.5" x 4.5" rectangles


From the bottom wing fabric cut:
(2) 4.5" squares
(2) 2.5" squares


To assemble the body, take (4) 1.25" background squares and the body rectangle piece. Lay a background square on each corner of the body piece. The background squares will not overlap, they will just meet in the middle of the rectangle.


Now, one at a time, sew diagonally from corner to corner on each of the background squares. You can mark a line on the back of each one and sew on the line if you want to, but I didn't do that for any of my corner squares for this block. They are small enough to be manageable by hand without moving too much. Pinning usually helps me more than a line across the block.
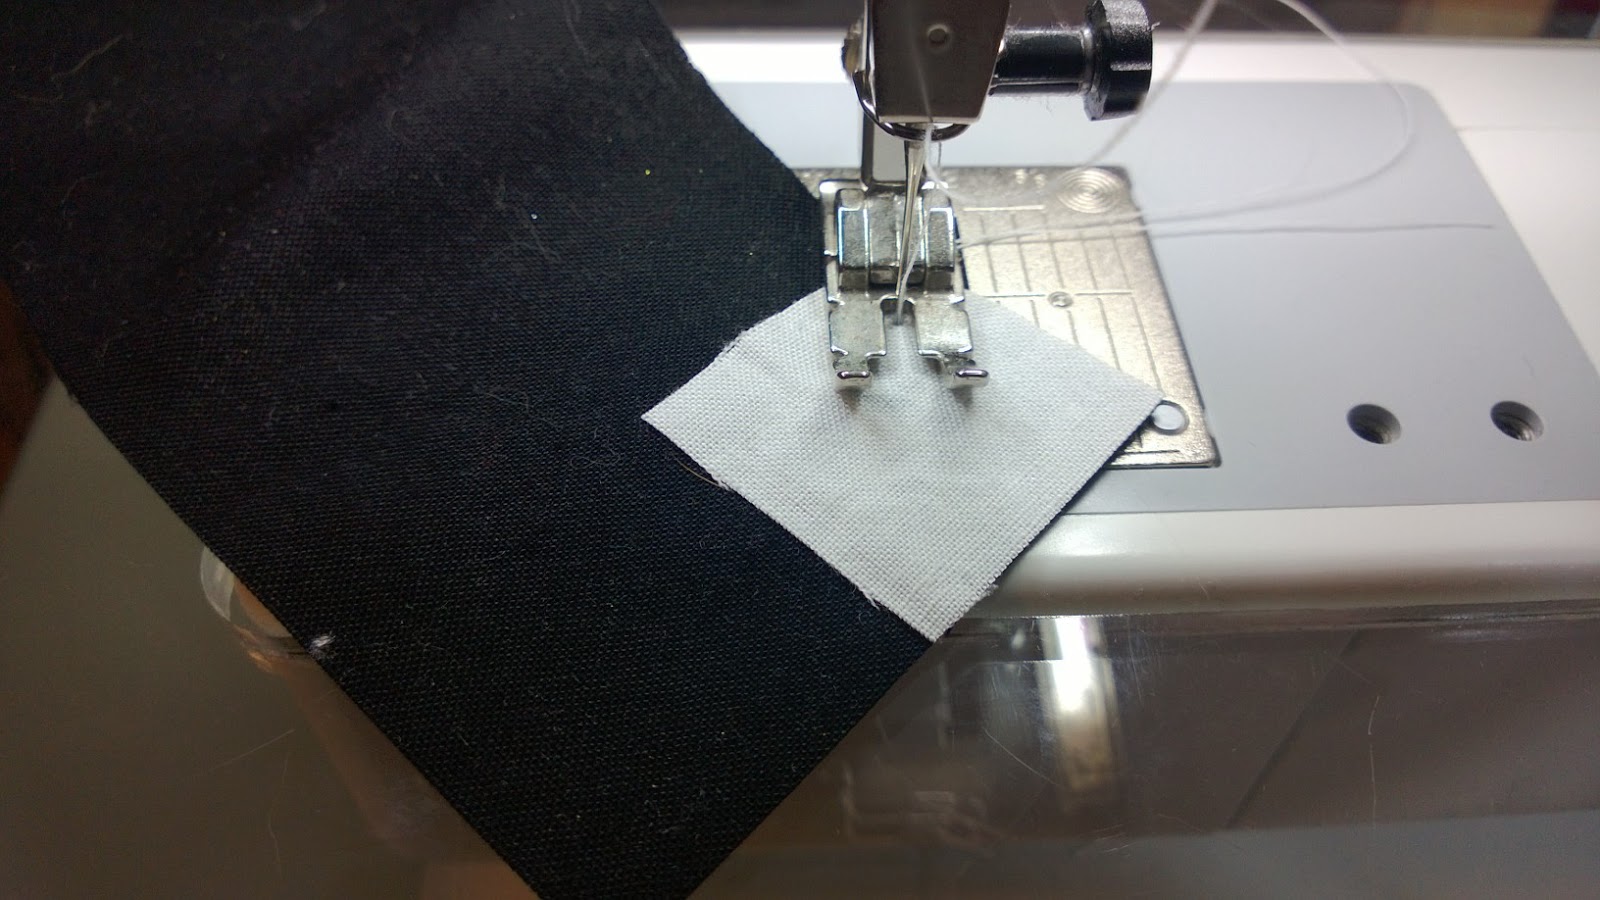

Once all four corner squares are sewn on, set this piece aside.

To assemble the top wings you'll need the 2 top wing pieces, (4) background 2.5" squares, (2) background 1.25" squares and both of the bottom wing 2.5" squares. Lay out the pieces like this:


The pieces will be a mirror image of each other so that the wings are symmetrical. 

Starting with the bottom wing squares, sew diagonally across the small square (right sides together) to attach that piece to the top wing piece.


Trim 1/4" away from the line you just sewed:


Press toward the bottom wing pieces.


Now sew on the rest of the background squares in the same manner. The large one on the bottom with the bottom wing square will overlap the bottom wing piece. Set the top wing pieces aside for trimming and pressing later.

To assemble the bottom wings you'll need both bottom wing 4.5" squares, (2) 2.5" background squares and (4) 1.25" background squares. Lay out your pieces like this:


Sew them together one at a time on the diagonal to attach the background squares to the bottom wing pieces. 

Now, take all of your pieces and trim each corner square you sewed on, 1/4" away from the seam. Your pieces should look like this now:


Now you're ready to press your seams. For the body piece, press toward the background squares. For the top wings, press the top two corner squares toward the large wing piece and press the bottom two corner squares away from the large wing piece. For the bottom wings press all of the corner squares toward the wing piece. Your seams should look like this:


Pressing in this manner will make your seams nest for the next steps in sewing the block all the way together.

Now, sew each top wing to each bottom wing. The corner square seams will nest giving you really crisp points. I usually pin in the middle by the nesting seams and near the end.


To make your points match up perfectly your stitch line should intersect the corner square seams where they cross. Like this:


Now, press the wings. I pressed toward the bottom wing since the top already had a lot of seams. You could press the seams open though.


Now sew your wings to your body. The bottom corner squares on the bottom wing will nest with the corner squares on the bottom of the body piece. I started pinning here, then pinned the top end and then pinned each seam in the middle. Press the seams toward the body piece (or again you can press them open if you wish).


Now, take your last remaining background rectangle (10.5" x 2.5") and sew this to the top of the butterfly, pinning in place. Press toward the background rectangle.

The last thing you have to do is embroider your antennae. I drew mine on with a washable pen. 


Then embroider and pressed the block one last time.


And that's it! :) Now you have a beautiful butterfly. But, he needs a few friends, so this is what he looks like with some others:


I'm planning on making 9 of these into a baby quilt. The outside columns will be flying north and the middle column will be flying south. I also plan to add a 2.5" sashing between the columns to give it a little more width and then border the whole thing out in 2.5" background fabric. 

I found this pattern is great for scraps. I didn't really cut into my stash at all except for the background white pieces. A black and white jelly roll would also work well since the background pieces and the body pieces can easily be cut from the 2.5 inch strips. Anywho - thanks for reading all the way to the end and happy crafting!

Wednesday, November 14, 2012

Quilt Design

Do you design your own quilt patterns? Or do you use books, magazines, PDFs, etc? I used a book pattern for my long-term WiP - Over the Rainbow - but that's the only one I can think of...

Sun, Moon & Stars

Designing is something I love to do. Obviously every combination of squares, triangles and rectangles have already been put together, so I'm guessing none of my blocks will ever be "original," but that's OK by me. 

Rainbow Sherbet

I guess I'm not drawn to patterns in books or magazine very often. I want to really be a part of my craft from start to finish. There's something therapeutic and kind of magical about seeing something I design come to life.

Stardust

Sometimes I get into binges of designing patterns with all the same theme. Like stars, or half square triangles or Christmas quilts.

Christmas Morning

Other times I want to make a design with big pieces (or really small pieces).

Bejeweled

Lately I've been putting together quilt patterns with lots of different blocks. I saw what I would consider a "sampler quilt" at a bed and breakfast we stayed at this summer and just fell in love with it. Sampler quilts remind me of cozy lodges and being comfortable - curled up by a fire with a good book and a snugly quilt.

Cabin Fever

I can see so many things done with lots of different scrappy fabrics. 

Northern Lights

I tend to keep my patterns in pencil shading so that I can picture them with any color. The ones I've specifically assigned colors to I probably wouldn't change, but I don't want to hinder the process - especially if I have some kind of color epiphany when I dig my patterns back out.

A Stained Glass Christmas

Most of these I'll never get around to actually making in to quilts. It would be great if I had that much time (and money) to spend on quilting, but there are only so many hours in the day.

Aztec

The other issue is that once I get these ideas down on paper there always seems to be another pattern that takes their place, or something I want to work on first. So everything ends up on the back burner. 

Forest Lights

I guess I don't have a lot of works in progress (not enough storage for all of that), but I sure have a lot of patterns in progress!

Farfalle

So, if you're ever in need of a quilt pattern, and you just aren't finding something that tickles your fancy, let me know! I'm sure I have a couple you can borrow. I might even figure out the yardage for you... :) Happy crafting!

Thursday, July 26, 2012

Christmas Table Runner and Tutorial

So, I must be thinking Christmas for more than just the blog hop that's coming up. (My day is August 4th, so stop back to see what I've put together for that!) My husband's aunt Sue's birthday was today (she also happens to be my boss) so I put together a table runner for her. I used some fabric from the stash that my mom brought me, she gave me a fat quarter bundle from Nancy's Notions in some great Christmas prints. I threw in some dark green from the stash that Aunt Sue gave me and I had the perfect amount of fabric for this table runner.

I found a picture of this pattern on Google Images by searching for "table runners." You can find the link to the picture here. The post didn't come with a pattern, so I tried making one up.


Here's the runner that I'll be using in the tutorial when I talk about fabric colors and pieces. The colors I use are red, green, brown and white. I've re-written this to hopefully make it more user friendly. If you notice any mistakes or have questions, please feel free to email or comment. I'm not always perfect, but I am always happy to help!

Anyway, here's the tutorial...

Ingredients:
* 4 coordinating fabrics (a quarter yard is plenty for the white, red and green fabrics, but it's cutting it really close for the brown - I'd suggest getting 1/3 yard for the brown pattern pieces to be safe)
* batting
* fabric for the back
* binding strips (mine was cut to be 2.25 inches wide, strips sewn together on the diagonal, and pressed in half)

Directions: (final size 14 inches wide by 58 inches long)
Cut the following pieces from coordinating fabrics:
    From the red fabric cut:
    * Five 6.5 inch squares
    * Two 3.5 inch squares

    From the brown fabric cut:
    * Twelve 3.5 inch squares
    * Two 5.5 inch by 2.5 inch rectangles
    * Two 3.5 inch by 2.5 inch rectangles
    * Three 6.5 inch square - cut these in half on the diagonal to make 6 triangles
    * Six 5.5 inch by 1.5 inch rectangles

    From the white fabric cut:
    * Twelve 5.5 inch by 2.5 inch rectangles from white fabric
    * Twelve 3.5 inch by 2.5 inch rectangles from white fabric

    From the green fabric cut:
    * Two 6.5 inch squares - cut these in half on the diagonal to make 4 triangles
    * Four 5.5 inch by 1.5 inch rectangles

Sew the 3.5 inch by 2.5 inch brown rectangle cuts to 3.5 inch red squares. Then sew the 5.5 by 2.5 inch rectangle to the side of the piece you previously formed. You'll form blocks like shown in the pictures below.


Do the same thing with the 3.5 inch squares from the brown print and the small white rectangles. Press seams toward the darker fabric.


Sew each 5.5 by 1.5 brown rectangle to the top of one of the white and brown units you just created. Also sew each green 5.5 by 1.5 rectangle to the top of one of the white units. You will have two white and brown units left over with no top piece. These are used in the end rows.


Lay out the pieces so you know everything is pointing in the right direction.


Here are some pictures for a closer look at the rows:

Rows 1 and 2:

Rows 3 and 4:

Rows 5, 6 and 7:

Here's a link to a PDF that I created for the layout of the table runner. This should allow you to see the blocks/colors used in each row better than the pictures I was able to take as I was sewing. This PDF shows the table runner put together BEFORE trimming off the end pieces. So if it looks a little funny, that's how it should look! :) Christmas Table Runner Layout

Sew the pieces together into the rows as shown. You'll notice on the first and last rows that the triangle on the end is longer than the other pieces. This is OK! You'll be snipping off the excess at the end. You'll want to pin it like this:
See that the right angle of the triangle matches up with the corner of the first block you are sewing it to. You'll have the point sticking out at the top.

For the other end triangles in the middle rows you'll pin like this:
The right angle matches up with the corner and then the point will line up with the long edge of the block.

Press each strip's seams in an alternating pattern. Press the first strip's seams to the right, the second strip's seams to the left, the third strip's seams to the right, so on and so forth. This will make it easier for your blocks and points to match up when you sew the strips together.

Sew the strips together. This is a little goofy since the rows are diagonal. What you want to do is nest the seams of the red fabric pieces, like this:

First and second rows ready to pin together:

Here I have the rows slightly apart so you can see where the pieces match up. The red block will be the only matching seam on most of your rows (the first and last rows will have a couple more seams that match). This is what gives it the zig-zag effect when it's all done - all of those un-matching seams. Once you see one, you'll get the hang of it. Like you did when sewing the blocks into rows, you'll pin the end triangle right to the tip of the row it's joining. So, start pinning from the red blocks in the middle and work your way out to both ends. Then sew them together.

And here are the first two rows sewn together:

Continue until you have all of the rows sewn together. Press the seams flat however you choose to do it. I usually just press the whole thing in one direction, but if you like to press open, go for it!

Trimming up is the last thing to do now! You surely noticed that extra bit on the first and last rows:

And you also probably have some little corners sticking out along the sides from the triangle pieces: (similar to ones you get when you have to trim up half-square triangles)

Well, now we get to make it look all pretty! Take a ruler and chop off the tip of that triangle on the first and last rows. This is going to make it look just like the other side of the runner so it is balanced.


You'll do the same thing with any little corners you have sticking out on the sides. How you pressed your seams will determine how many of those little corner things you have to trim off. Just trim them flush with the side of your runner.


Layer over back fabric and batting, baste, and quilt as desired. Trim the edges and add the binding in your preferred method (I typically machine stitch it to the front and hand stitch it to the back). And now you're done!

Here are just a couple fun cat pictures to round out the post. This is my cat Sasha who has had a few shout outs in some of my other posts. She is always curious with what I'm putting together and has to be in the same room with me - always. So, here she is relaxing on my lap while I'm hand stitching the binding on the runner, and the other picture is a shot of her in her favorite place to hang out while I'm stitching on the machine. Sometimes it amazes me that I get anything done with her always underfoot! :) Happy crafting everyone.


July Finishes
Related Posts Plugin for WordPress, Blogger...