
Hello everyone! This weekend I was working on my Quilty-Barn-Along blocks and was thinking it could really use a tractor with all of those barns. So, I sat down with my graph paper and started designing this:

I love this tractor so much! It's the same dimensions as the barns (14.5" x 14.5" without sashing) so it will fit nicely in with my quilt. I also added a little quilt block to the side of the tractor so it can join in the fun as well. The little quilt block is a 4.5 inch unfinished block though, so a little smaller than the ones in the barns. I'm just not sure if I'll use the tractor on the front of the quilt or put it on the back. My mom said the place where I put the quilt block would also make a nice space for a quilt label for the back of the quilt. What a smart woman!
So, I thought maybe other people would want to make a tractor block too. If no one else does, then this post will be just for my mom who said she wants to make a whole quilt of tractors. Haha - I think she's a bit biased (quilty pun intended!). :) So, in case you do want to make one, here's a little tutorial:
Ingredients:


You'll use (4) of the 1.5" x 6.5" tractor pieces, (2) 1.5" background squares, a 3.5" x 5.5" background pieces and the pieces for the seat.
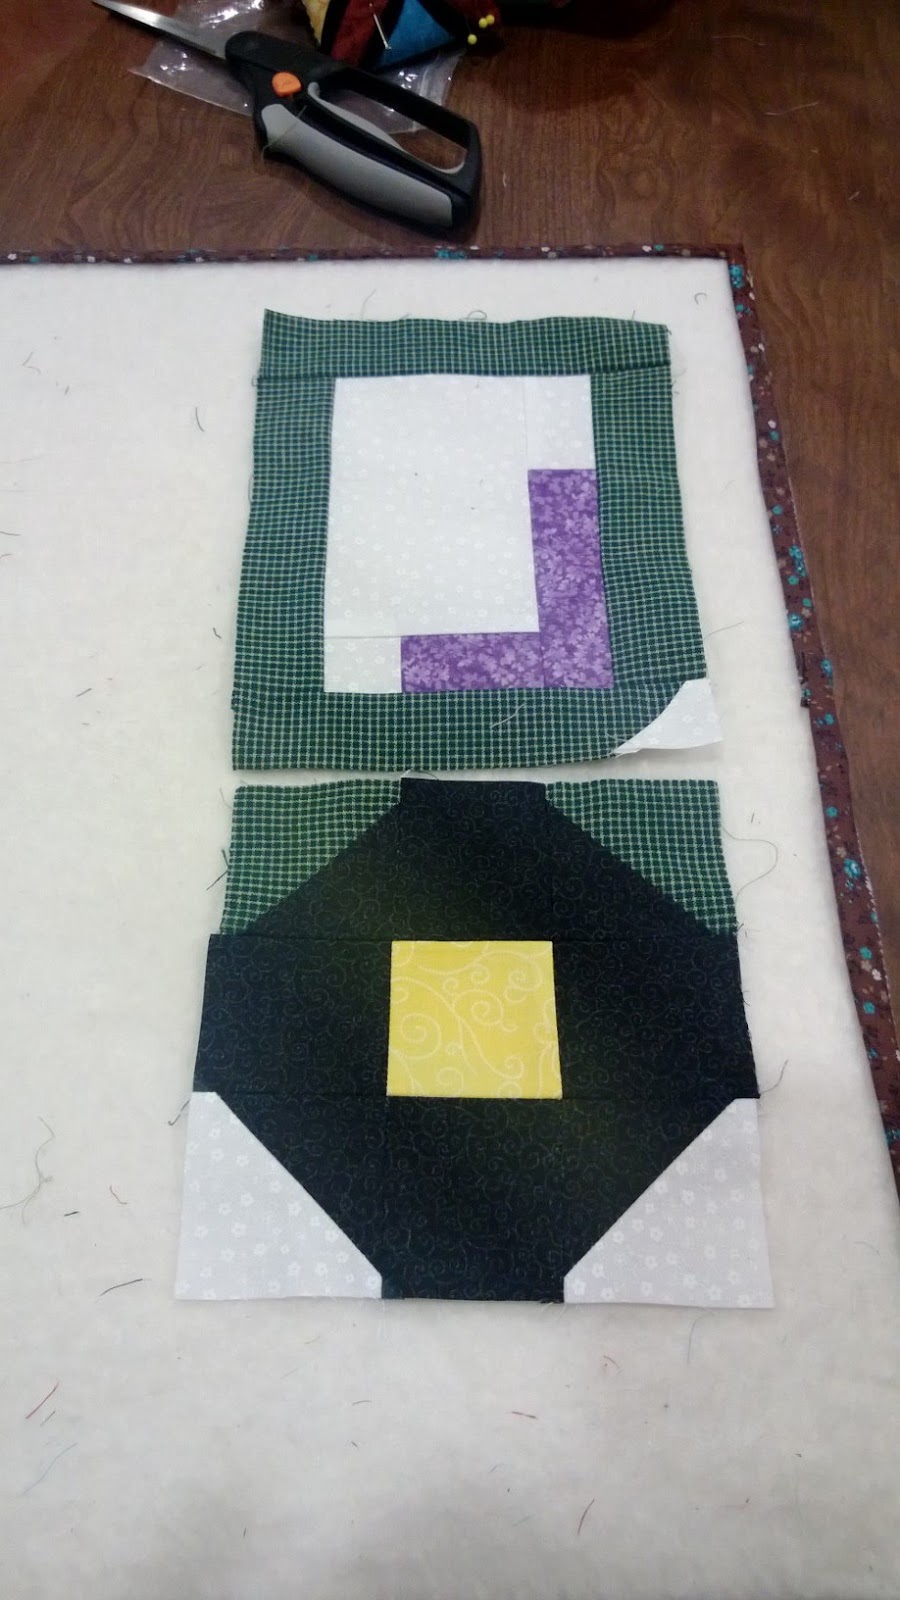
Sew the background pieces to each piece of seat like below. Then sew an easy corner triangle onto that bottom piece of the tractor. Make sure your triangle goes the right way! You want it to be on the bottom right hand side.

Then you're going to sew all of these pieces together to make the cab. Sew seat bottom the large background fabric piece and press. Then sew on the seat back and press. Then sew the sides of the tractor cab on and press. Then sew on the top and bottom.


You're going to sew one 1.5 inch square on as an easy corner to the top of the smokestack rectangle. Make sure it's pointing the right way, otherwise your tractor driver will get a face full of engine exhaust and that's never good! :) You want the background triangle to be on the top left hand corner of the smoke stack.
Press and sew on the second 1.5 inch square to the top of the smoke stack. Press. You'll have the 3.5" x 5.5" piece of background fabric on the left side of the smoke stack and the 4.5" x 5.5" background piece on the right side of the smoke stack. More space between the driver and that smoke stack. ;) Press and set aside for now.


I love this tractor so much! It's the same dimensions as the barns (14.5" x 14.5" without sashing) so it will fit nicely in with my quilt. I also added a little quilt block to the side of the tractor so it can join in the fun as well. The little quilt block is a 4.5 inch unfinished block though, so a little smaller than the ones in the barns. I'm just not sure if I'll use the tractor on the front of the quilt or put it on the back. My mom said the place where I put the quilt block would also make a nice space for a quilt label for the back of the quilt. What a smart woman!
So, I thought maybe other people would want to make a tractor block too. If no one else does, then this post will be just for my mom who said she wants to make a whole quilt of tractors. Haha - I think she's a bit biased (quilty pun intended!). :) So, in case you do want to make one, here's a little tutorial:
Ingredients:
For the background (white in my block) you'll want to cut 19 pieces:
(2) 3.5" x 5.5" rectangles (one for the smoke stack, one for the tractor cab)
(10) 1.5" squares (used throughout the block)
(1) 4.5" x 5.5" rectangle (for the smoke stack section)
(1) 1.5" x 2.5" rectangle (for the cab of the tractor)
(1) 1.5" x 6.5" rectangle (for the engine of the tractor)
(2) 2.5" squares (for the large wheel)
(1) 3.5" square (for the small wheel section)
(1) 2.5" x 3.5" rectangle (for the small wheel section)

For the tractor (green in my block) you'll want to cut 11 pieces:
(7) 1.5" x 6.5" rectangles
(2) 1.5"x 4.5" rectangles
(2) 2.5" squares (these will be used when you sew the tires)

For the tires (black and yellow in my block) you'll want to cut 18 pieces:
(8) 2.5" squares in black (large tire)
(8) 1.5" squares in black (small tire)
(1) 2.5" square in yellow (large tire center)
(1) 1.5" square in yellow (small tire center)


For the seat you'll want to cut 2 pieces:
(1) 1.5" x 2.5" rectangle
(1) 1.5" x 4.5" rectangle

For the smokestack you'll want to cut 1 piece:
(1) 1.5" x 4.5" rectangle

For the quilt block, you can make it in 2 different ways:
First Way: Using all half square triangles you can make it with 28 pieces:
(16) 1.5" squares from the background fabric (white in my block)
(12) 1.5" squares from the star fabric (red in my block)

Or Second Way: You can use larger pieces and you'll want to cut 21 pieces:
Background:
(1) 2.5" square (cross word puzzle print)
(4) 2.5" x 1.5" rectangles (black fabric)
(4) 1.5" squares (blue fabric)
Star fabric (red in my block):
(12) 1.5" squares

In my completed tractor block I used all half square triangles and 1.5" pieces because I had several of these left over from my quilty barns already. But, you'll will have less seams and be more accurate if you use the larger pieces instead. I just wanted to recycle all of those tiny pieces that I had left over. Anyway, back to the tutorial!
Here's a picture of the sketched out design which might also help you visually:

Once you have all of your pieces cut out you're ready to sew it all together. I started with the star block since it has the most tiny pieces to keep track of.
If you're using all 1.5" squares, pair up a star square to a background square and sew on the diagonal across the squares from corner to corner. This is Lori Holt's easy half square triangle method. Then cut 1/4 inch away from the seam and press open to get a total of 12 half square triangle blocks. Lay them out with the left over background blocks like this:

Then sew them into rows and press the seams open. Then sew the rows into the square block and press those seams open to get this:

If you're using the larger pieces for the star here's what you'll do.
1. Take your 2.5 inch square background piece and lay a 1.5 inch star piece over the corner. Sew across the small piece from corner to corner diagonally. Trim cut 1/4 inch away from the seam and press toward the corner. This again uses a tip from Lori Holt - her easy corners method. Repeat this on all 4 corners of the 2.5 inch piece to get the center of the star block.


2. For each 1.5" x 2.5" background rectangle, you'll pair it up with (2) 1.5" star squares. You'll use the same technique you would for step one, but you only have 2 corners to do instead of 4. Trim 1/4 inch away from the seam and press toward the star block pieces.
3. Lay out your block like this

and then sew the rows together and then sew the rows into the block. Press seams open where you can to reduce bulk and you're done!


This way was faster and easier than all of the half square triangles, so it just depends on what pieces you want to use. :)
OK, now you're ready to assemble the tractor!
I started with the wheels and went from large to small. Lay out your pieces like this:
 |
| Large Wheel with 2.5 inch pieces |
 |
| Small Wheel with 1.5 inch pieces |
Then you're going to sew them together. The four corner squares will be made into easy half square triangles. Pair them up right sides together, sew on the diagonal across the square, trim 1/4 inch away from the seam and press toward the background fabric.
Once that's done, you'll sew them into rows, and then sew the rows into a block. It will look like a snowball block. :) And now you have two tires!

Next I put together the cab of the tractor. For this I started with assembling the pieces of the seat and the bottom piece of tractor under the seat. Lay out your pieces like this so you know where everything goes:

You'll use (4) of the 1.5" x 6.5" tractor pieces, (2) 1.5" background squares, a 3.5" x 5.5" background pieces and the pieces for the seat.
Sew the background pieces to each piece of seat like below. Then sew an easy corner triangle onto that bottom piece of the tractor. Make sure your triangle goes the right way! You want it to be on the bottom right hand side.

Then you're going to sew all of these pieces together to make the cab. Sew seat bottom the large background fabric piece and press. Then sew on the seat back and press. Then sew the sides of the tractor cab on and press. Then sew on the top and bottom.

From here you're ready to put together the cab and the large wheel. Put right sides together and sew the cab and large, back wheel together. Press and set those pieces aside for later.
Now you're ready to make the front end of the tractor. I started with the smokestack piece. Lay out your pieces like this:

You're going to sew one 1.5 inch square on as an easy corner to the top of the smokestack rectangle. Make sure it's pointing the right way, otherwise your tractor driver will get a face full of engine exhaust and that's never good! :) You want the background triangle to be on the top left hand corner of the smoke stack.
Press and sew on the second 1.5 inch square to the top of the smoke stack. Press. You'll have the 3.5" x 5.5" piece of background fabric on the left side of the smoke stack and the 4.5" x 5.5" background piece on the right side of the smoke stack. More space between the driver and that smoke stack. ;) Press and set aside for now.

Now you're ready to make the engine part! This was my favorite. :) Lay out your pieces like this:

You'll make those two small background squares into easy corners on that 1.5" x 6.5" piece of tractor fabric. Like this:

Then sew a 1.5" x 4.5" piece of tractor fabric to the left and right sides of your quilt block. Press. Then sew on a 1.5" x 6.5" piece of tractor fabric to the top and bottom sides of your quilt block. Press. Then sew on the front piece of the tractor, then sew on the 1.5" x 6.5" piece of background fabric to the front. Press this piece and set aside for now.
Now you can get the small wheel ready for action. Lay out your pieces like this:

Now sew those together in a row. You'll have the 2.5" x 3.5" piece of background fabric on the left of the wheel and the 3.5" square on the right side of the wheel. Press.
Now you can sew all of the front end pieces together! :) Lay them out like this:

Now sew them together and pin where you feel it's needed. Press.
Now you can sew the front to the back and have a completed tractor!


At this point it should measure 14.5" x 14.5". I added an embroidered steering wheel to my cab as well:

So, there you have it! A quilty tractor to go along with your quilty barns! :) My mom also said it would be neat to have a large 4.5 inch square of crop fabric (like corn or wheat) instead of the quilt block on the side. She's just full of good ideas. :) If you make one, I'd love to see what it looks like!

And just for fun, here's a picture of it with all of my barns so far. I'm really enjoying this project, so thanks so much to Lori Holt for getting us all going!! Happy quilting everyone!

P.S. I'm not perfect, so if you find something wrong with this tutorial, just let me know! :)
Hi!!! I love it!!! Your mom is soooo right!!! It would be a great place for the label!!! But I love it for the front also!!! Thanks for the tutorial!!! I haven't started the quilt yet but I sure want to add this to it!!!
ReplyDeleteI LOVE IT TOO! Actually, I love the entire quilt...However, for now, I am going to use this block for a yard flag. Our farm name is "Green Powered Farms," Long story made short... This is going to be added to the top of my "to do" list.. I will send picture when I finish..Thank you!!!!
ReplyDeleteThis is great! Thank you for sharing! Lovely quilt!
ReplyDeleteWow, you are one great designer! And how very generous of you to share the process. Kudos!!
ReplyDeleteThis is just what this quilt needed! I love the block on the tractor, too.
ReplyDeleteLove the barns and the tractor is so clever! Very nice.
ReplyDeleteSo cute!
ReplyDeleteOh my gosh Karen, this is SO cute! I'm sharing this post with my mom in case she wants to do something like this for my cousin and her young boys.
ReplyDeleteI think the quilt would look good with the tractor in the middle! Lori made a tractor block for the quilt label and since I've made all of my blocks, I will probably do that. I pinned this tute!
ReplyDeleteThanks!
Cute tractor. It goes very nicely with your barns
ReplyDeleteThank you for posting this block tutorial. I have just made one up for the centre of a quilt for my little boy!
ReplyDelete